4 Easter Party Crafts and Takeaways for Kids
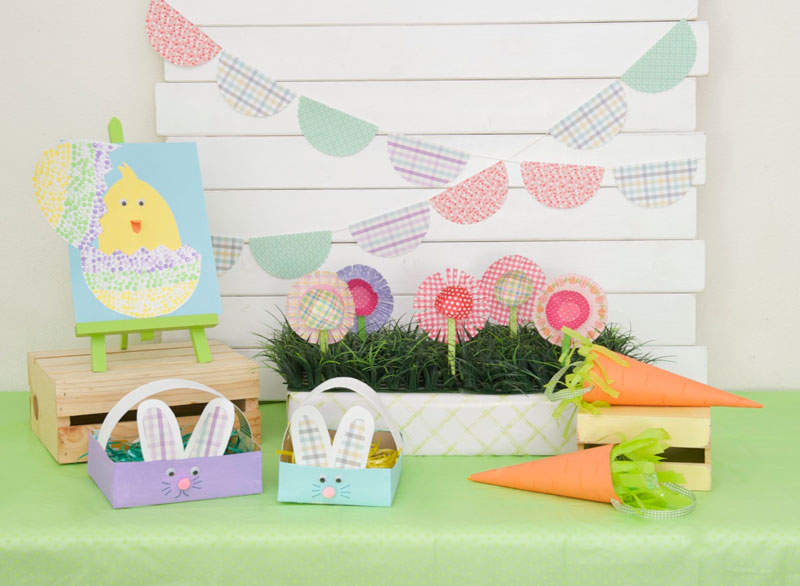
Easter is a GREAT holiday for kids. With all the eggs, candy, and bunnies…what kid wouldn’t love Easter? For this Easter party, I wanted to focus on creating 4 great crafts kids can make AND use!
Plus (with all my DIY party ideas), I like to incorporate a goodie bag for them to take home and for this party we did TWO! I hope you find this roundup of Easter party kid crafts fun and inspirational:
- Cereal Box Easter Bunny Basket
- Cupcake Liner Flowers
- Paper Carrot Party Favor
- Paper Easter Egg and Chick
Now grab your little ones and hop along to the nearest craft table!
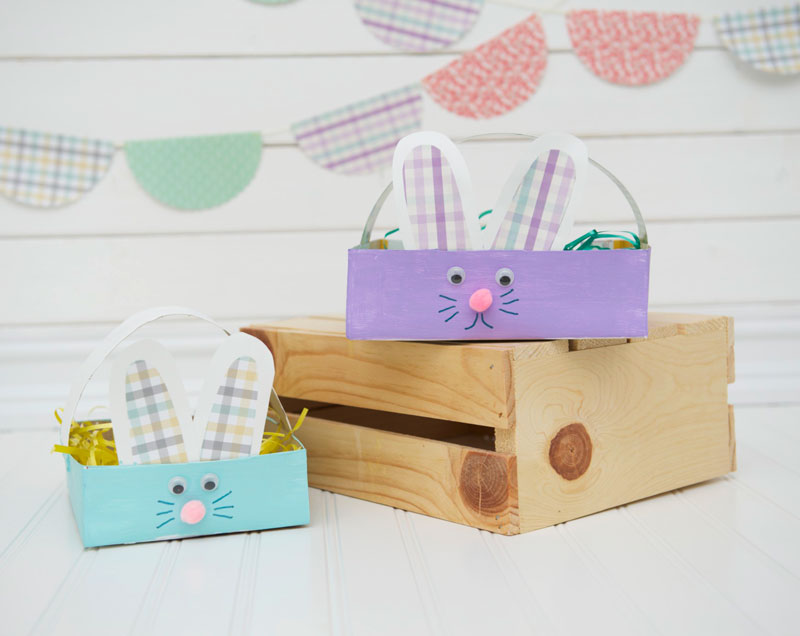
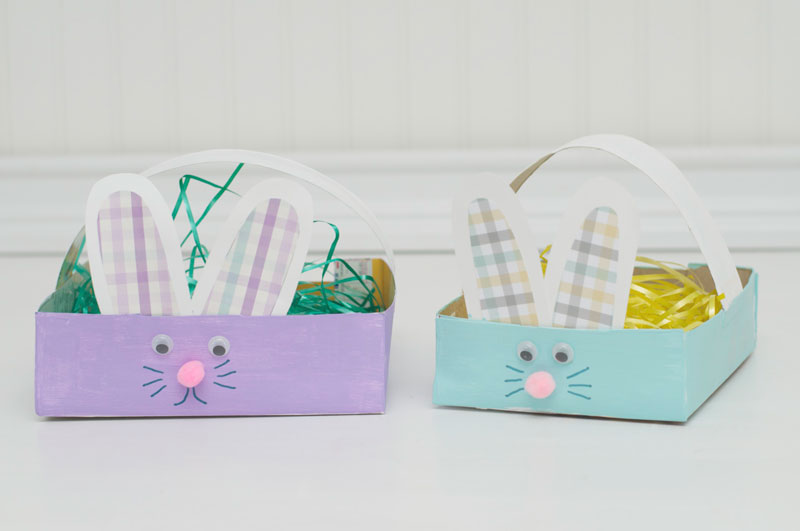
1. Cereal Box Easter (Bunny) Basket
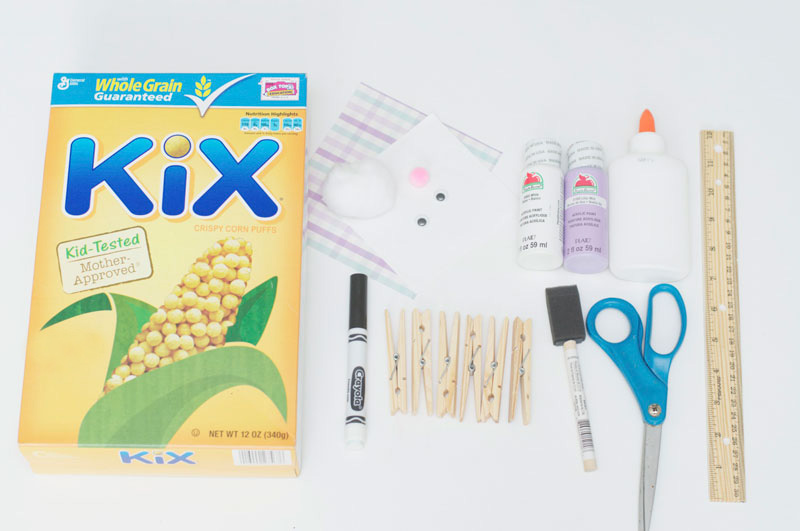
Materials
- Empty cereal box
- Paint
- Scrapbook paper
- Cardstock
- Pom poms (large and small)
- Googly eyes
- Glue
- Black marker
- Scissors
- Ruler
- Clothespins
- Paint brush
Getting Started
When I started working on this party, I really wanted to try making an Easter basket out of a cereal box. With a couple attempts (okay, like 6), I was FINALLY able to make the perfect Easter basket for my party.
This is definitely a craft you need to prep for a few days BEFORE the party. But once the baskets are constructed and primed, the kids will have a great time creating their Easter basket bunnies to take home!!
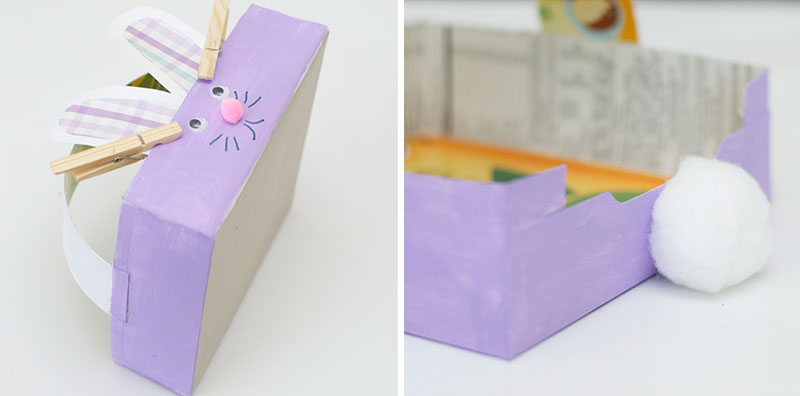
Step 1 – Create Your Basket Shape
I started off by taking the box apart (making sure I left the sides INTACT). Then, I pulled out my ruler…measured and cut 3 1/2 inches off the end of my box.
Once I had the size I wanted, I measured and cut 2 1/2 inches on ALL four sides of the creases in the box. Then, I folded the middle part of my box over.
Next, I folded my cardboard into my basket shape. With the other side of the box, I finally cut out my handle for the basket.
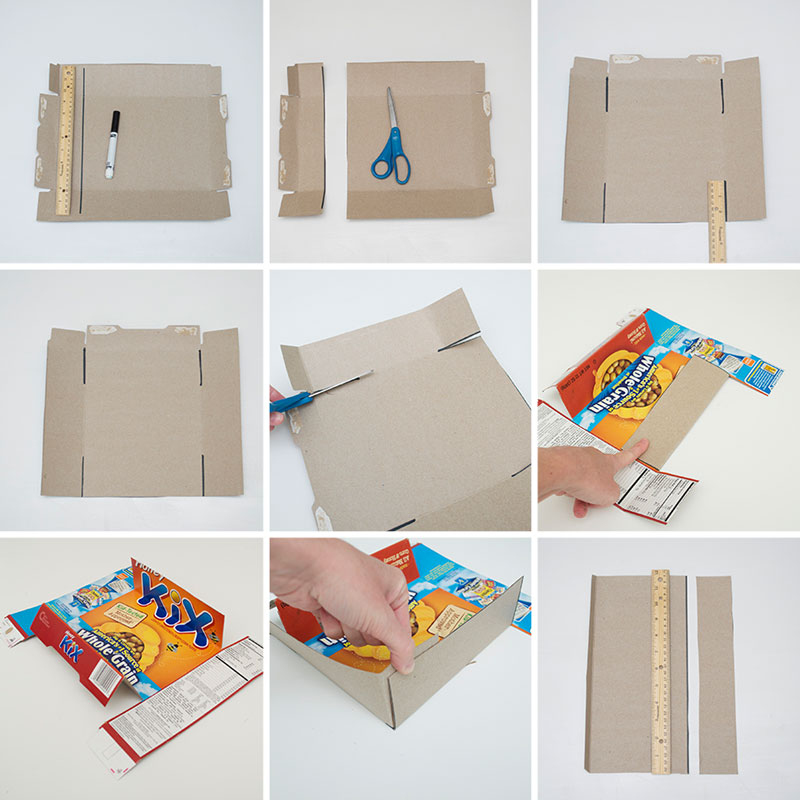
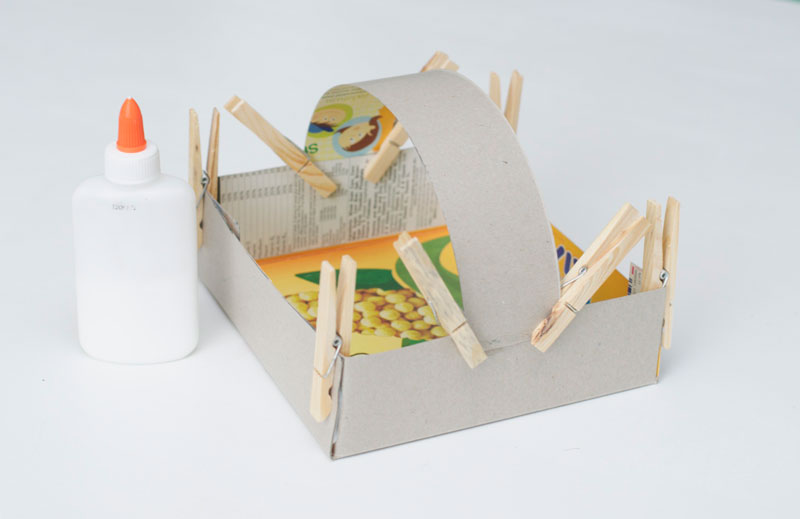
Step 2 – Construct Your Easter Basket
FIRST rebuild your basket and put glue on the pieces that overlap. When in position, secure with clothespins.
Next, attach the basket’s handle with glue. Again, secure the handle with clothespins. Let sit 1 hour to completely dry.
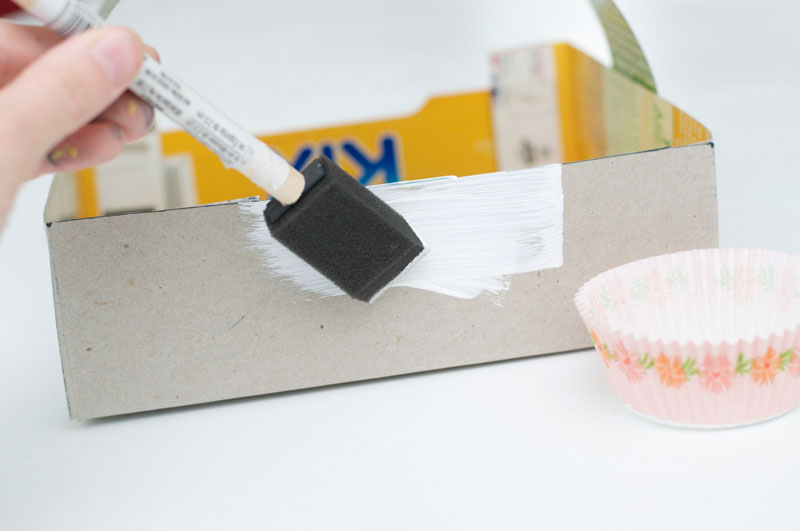
Step 3 – Prime Your Easter Basket
Once the glue was dry, I went over outside of the basket with white paint. So, when the kids are ready to paint, they’ll only need to add ONE coat of paint to their basket.
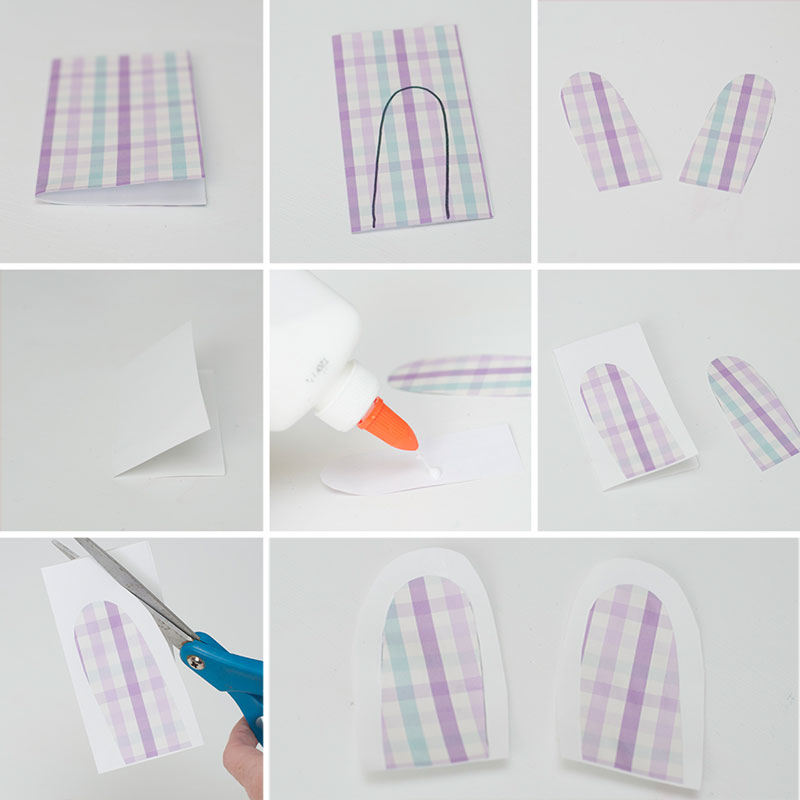
Step 4 – Make Your Bunny Ears
LAST step for prepping is making the bunny ears. I used a piece of white cardstock and a patterned piece of scrapbook paper. I bent the scrapbook paper in HALF and free handed my ears. Finally, I cut them out.
Next, I bent my cardstock in TWO and glued one of the patterned cut out ears to the white paper. I then cut the outer edge of the ears. Lastly, I glued the remaining pieces together. Super simple!
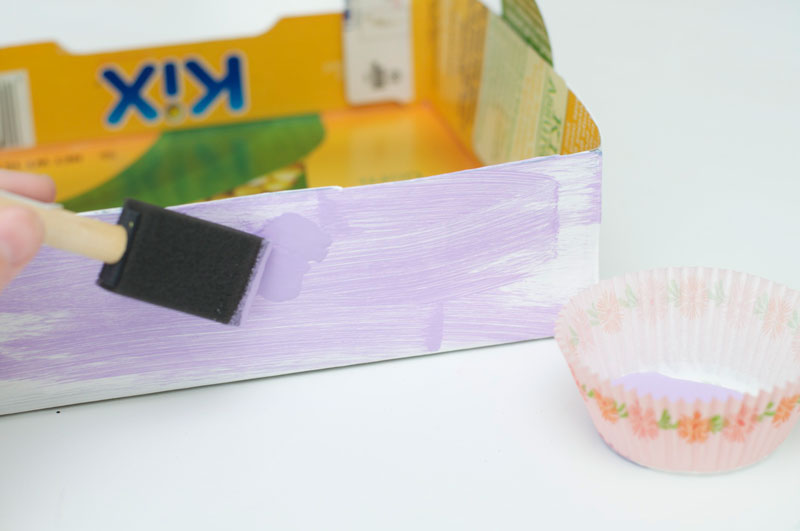
Step 5 – Paint Your Easter Basket
It’s the big day now, and the kids are ready to work on their baskets!!
They can paint on ONE coat of whatever paint color they would like their bunnies to be. Let dry 30 minutes.
Step 6 – Put Your Bunny Together
NOW it’s time to add our bunny’s cute face and tail. I added my eyes, nose and ears with glue (using clothespins to keep my ears firmly in place while they dried). Then drew on the cute whiskers and mouth.
After the face dried, I added our little bunny tail with glue. Voila! A cute and CREATIVE way to make an Easter basket bunny from a cereal box.
Finished Bunny Easter Baskets
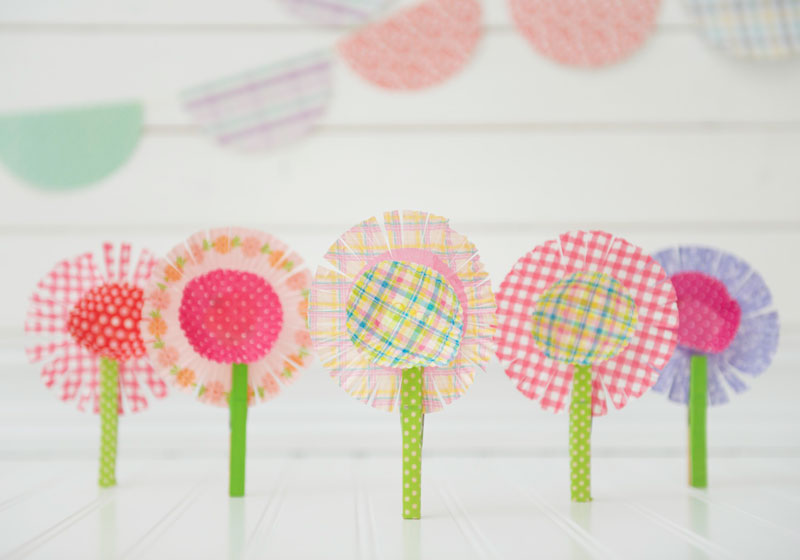
2. Cupcake Liner Spring Flowers
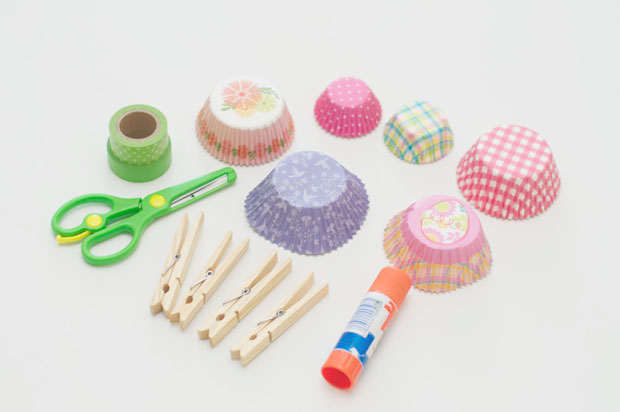
Materials
- Cupcake liners (large and small)
- Washi tape
- Clothespins
- Glue
- Age-appropriate Scissors
Getting Started
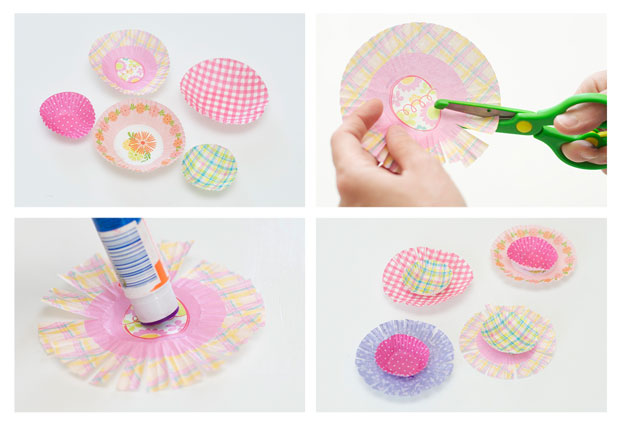
I LOVE using cupcake liners for craft projects and for this party, I wanted to make cute flowers with them.
Step 1 – Create Your Flower
Have the kids spread all the cupcake liners OUT by making them lay out flat. Then, use scissors (with parents supervision) on the larger cupcake liner to create the petals.
Add glue to the CENTER of the large cupcake liner and firmly press the small cupcake liner in the middle.
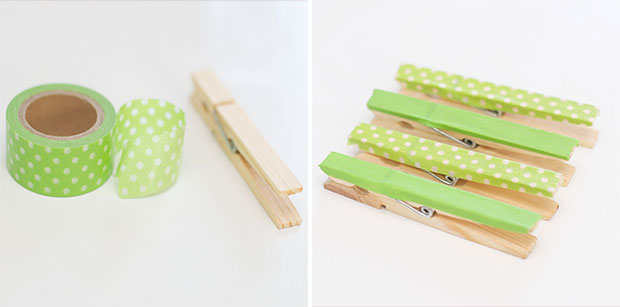
Step 2 – Create Your Clothespin Stem
Creating your stem is VERY simple. All you need to do is add a little green washi tape to the outer side of the clothespins.
Then, add the clothespin to the BOTTOM of the cupcake liner flower.
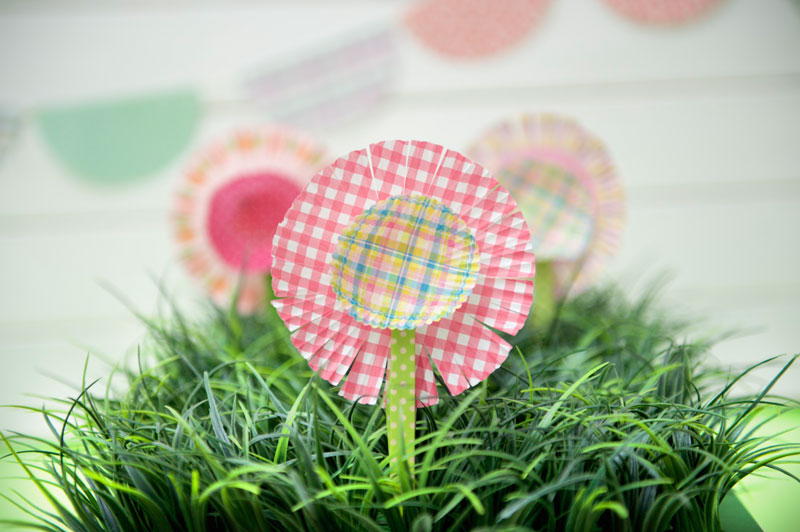
Finished Cupcake Liner Flower
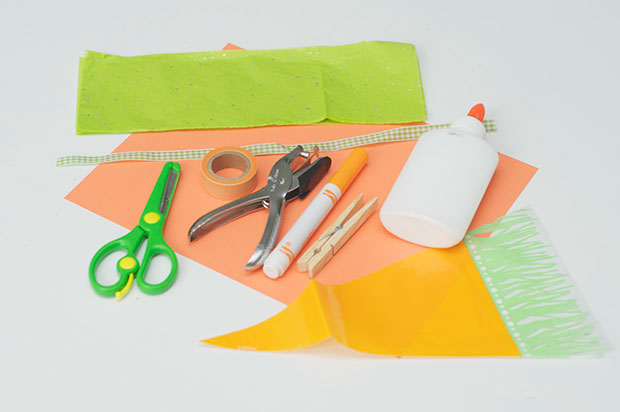
3. Paper Carrot Party Favor
Materials
- Orange cardstock
- Green tissue paper
- Glue
- Orange marker
- Washi tape
- Ribbon
- Hole punch
- Age-appropriate Scissors
- Scissors
- Clothespin
Getting Started
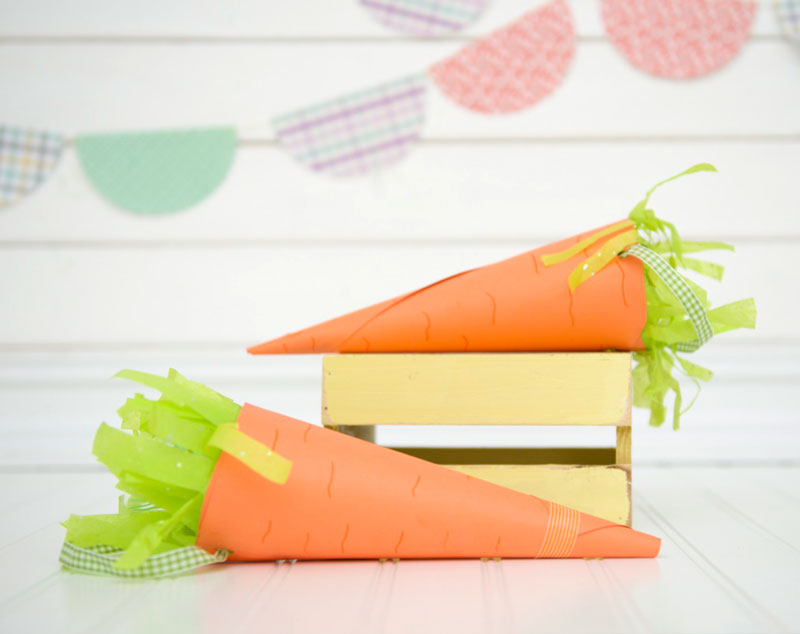
I loved the idea of having the kids make carrots at the party (and use them as a party favor).
I found these CUTE plastic carrot bags and thought they would be great to fill with Kix cereal. The perfect snack to take home.
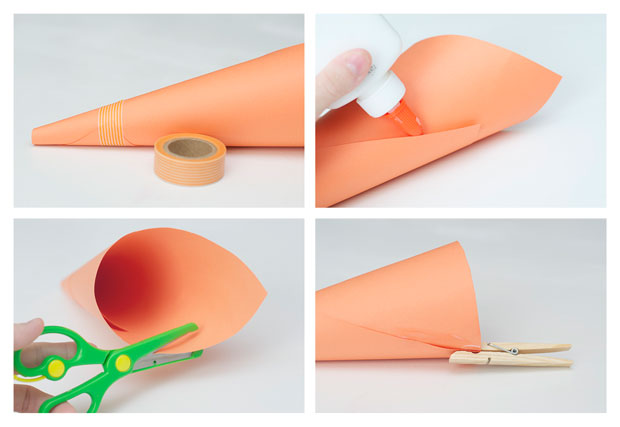
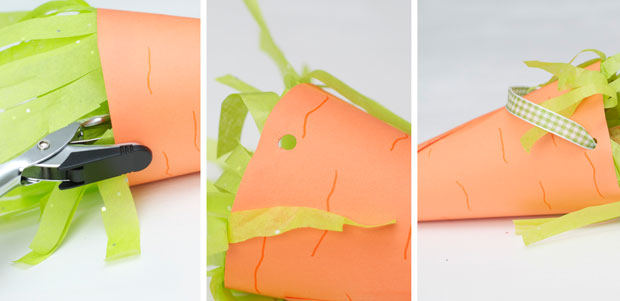
Step 1 – Make Your Carrot Cone
The kids might need a little help with this part.
Have the kids make a cone shape with ORANGE cardstock and secure the bottom with washi tape (to help keep in place). Add glue to the outer edge, then cut off the excess paper on top to make a nice FLAT top.
Use a clothespin to secure the carrot while the glue dries. Let dry 15 minutes.
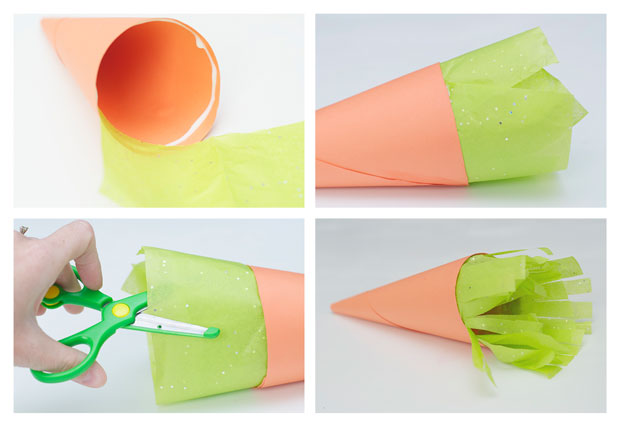
Step 2 – Add Your Top
Cut a strip of tissue paper for the top of the carrot. Then, have the kids add a layer of glue to the inside of their carrot.
Next, have them place the tissue paper along the INSIDE of the carrot (firmly pressing the tissue paper down) to keep in place.
Finally, cut a fringe for the carrot top (with parents supervision of course!).
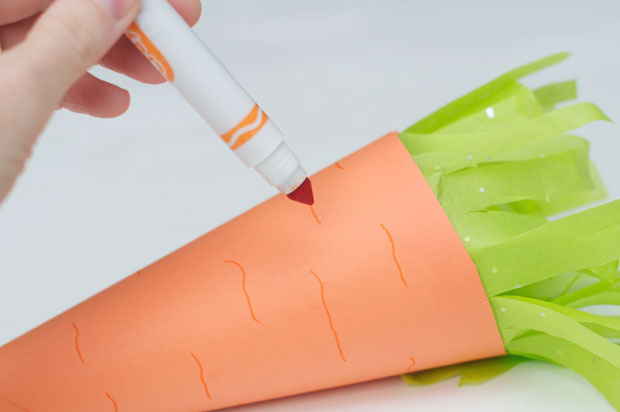
Step 3 – Add Texture to Carrot
Have the kids use an orange marker and draw HORIZONTAL lines to finish off their carrot look.
Step 4 – Add Your Handle
Parents (while the kids are playing), use a hole punch and add your decorative ribbon and bag of Kix cereal!
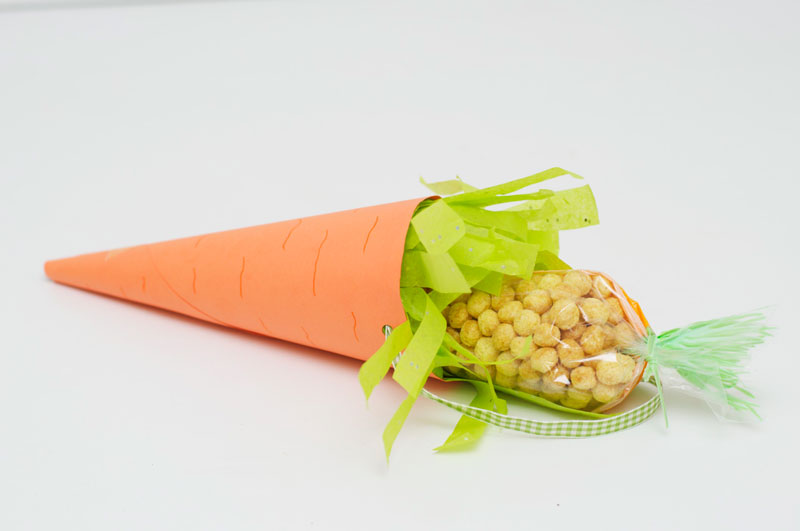
Finished Carrot Party Favor
4. Paper Easter Egg and Baby Chick
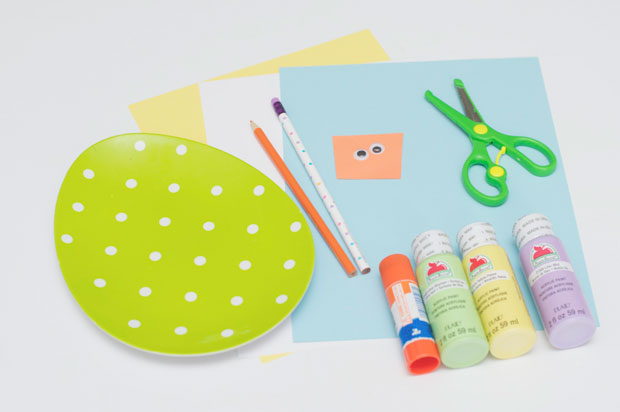
Materials
- Cardstock
- Paint
- Glue
- Age-appropriate Scissors
- Pencils
- Googly eyes
- Large egg shape
Getting Started
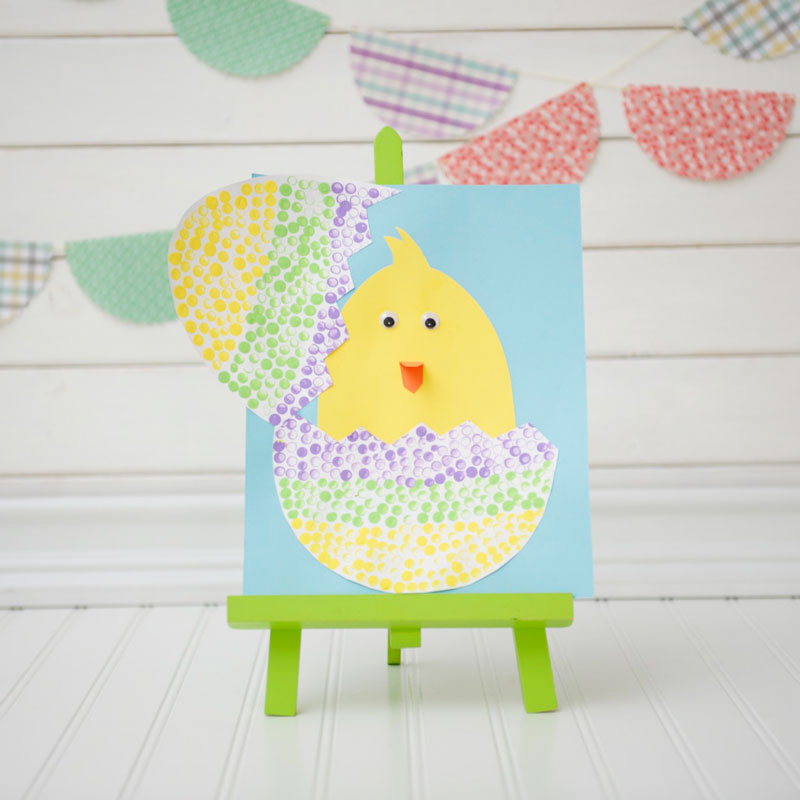
What Easter party would be complete without an Easter egg and little chick? Have the kids make their own Easter egg and chick to take home!
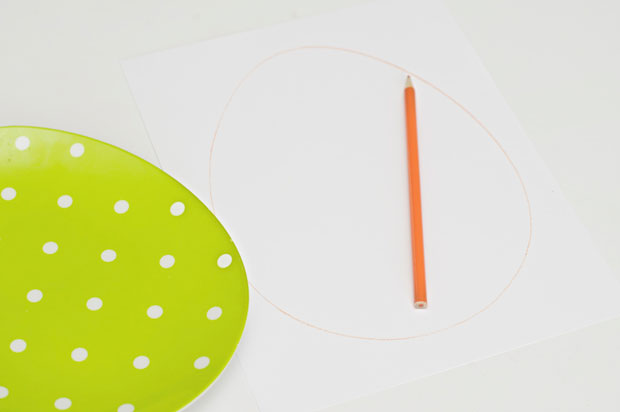
Step 1 – Trace and Cutout Your Egg Shape
Trace out any egg shape (that’s NOT larger than your paper) with a pencil and cut it out. I used an egg shaped plate that I had already.
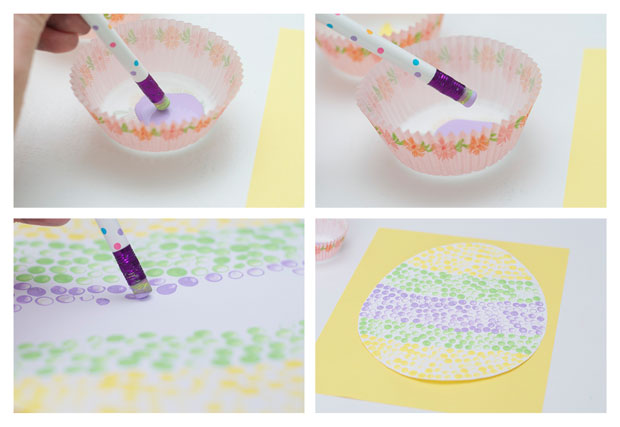
Step 2 – Add Your Pencil Stamps
Have the kids pick out their colors, and stamp a pattern on the egg using the END of a pencil.
It’s fun to see what creative ways they will make their eggs! Let dry for 20 minutes.
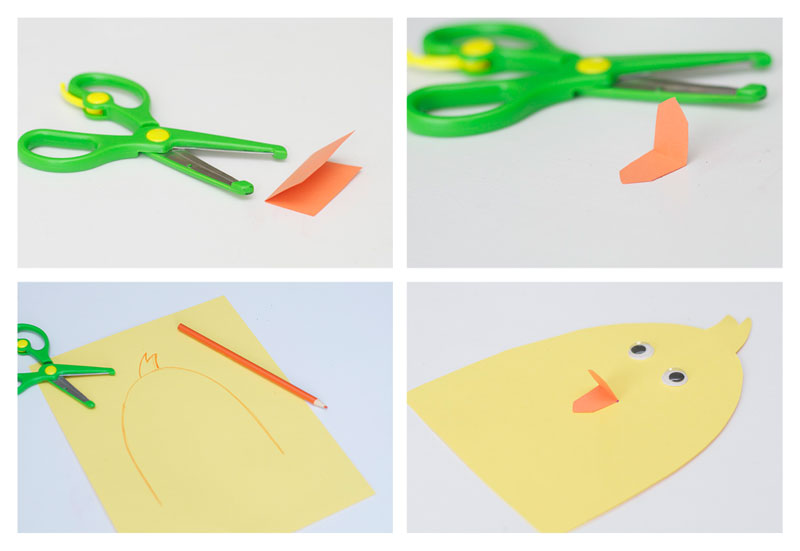
Step 3 – Draw and Cutout your Chick
Use a piece of orange cardstock (even a scrap) and cut out your beak by FOLDING the piece of paper over. Next, draw your chick shape and cut it out for the kids.
Then, have the kids add their chicks’ beaks and eyes!
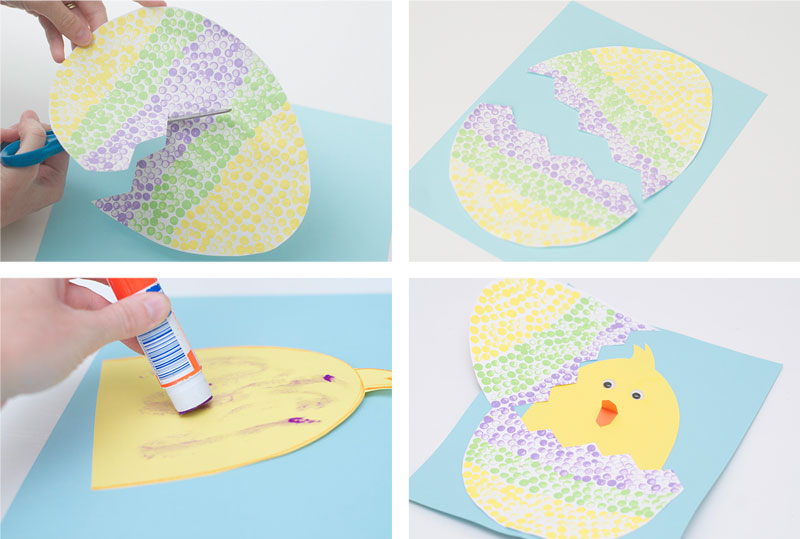
Step 4 – Add Your Egg and Chick
Cut their egg in half using a ZIG-ZAG pattern.
Glue your chick down first in the middle of the page. Then, add the BOTTOM half of the egg over your chick and the top half of your egg slightly hanging on the edge of the paper.
Now THIS chick’s ready for Spring!!
Finished Chick and Easter Egg

Now that was some Hippity-Hoppity Easter party fun! I LOVE crafting with kids at parties. It’s so rewarding to see my lil’ ones use their imagination.
If these Easter crafts leave you inspired, then have your children Spring to it!


